How to Install a Whirlpool Bathtub: Complete Step-by-Step Guide
Enjoying the benefits of balneotherapy at home has never been easier! Thanks to our guide, discover all the steps to install your whirlpool bathtub safely.
Installation, electrical connection, drainage system setup — every detail matters to prevent leaks and ensure a watertight system. Follow our professional advice to fully enjoy your hydromassage baths with complete peace of mind.
Requirements for installing a whirlpool bathtub
Preliminary checks
Before installing your whirlpool bathtub, make sure you have enough space.
Also check the strength of the floor: once filled, the water and equipment can exceed 300 kg. A weak floor could compromise safety.
Also ensure the presence and accessibility of hot and cold water connections for easy installation.
Electrical standards and regulations
The electrical installation of a whirlpool bathtub must comply with NF C 15-100 standards, ensuring safety and compliance. Your bathtub must be connected to a 30 mA residual current circuit breaker, with mandatory grounding and equipotential bonding to prevent electrical risks.
The connection must be made via a dedicated circuit, without extension cords or intermediate plugs.
Pay attention to safety zones: the bathtub and its electrical components must be installed at a safe distance from other equipment. A certified electrician can check your installation and ensure compliance with regulations.
Steps to install your whirlpool bathtub
Preparing the space
Before installing your whirlpool bathtub, carefully prepare the area. Start with a thorough cleaning of the space. Then apply a waterproof treatment to walls and floor to prevent moisture and infiltration.
Next, level the surface: a misaligned bathtub can cause leaks and poor drainage. Check alignment with a spirit level. A stable and flat base ensures optimal performance and extends the lifespan of your equipment.
Installing the bathtub
The installation of the whirlpool bathtub must be precise to ensure stability and watertightness. Start by positioning the bathtub in its final location, ensuring it is perfectly level using a spirit level. Adjust the adjustable feet if necessary to leave at least one centimeter of space from the floor.
Also check that the water drainage aligns correctly with the siphon and adjust if needed.
Plumbing connection
| The plumbing connection is a key step to ensure proper operation of your whirlpool bathtub. Start by installing the supply hoses for hot and cold water, connecting them to the mixer tap. Make sure to tighten all connections to avoid leaks. Then connect the drainage system, linking the siphon and the drain to the existing outlet. Ensure proper slope for optimal drainage. Finish by filling the bathtub and draining it to check for leaks. | 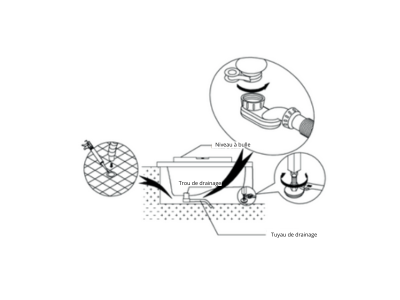 |
Safe electrical connection
The electrical connection of a whirlpool bathtub must follow strict standards to ensure your safety. Start by connecting it to a dedicated circuit protected by a 30 mA circuit breaker, directly linked to the electrical panel.
Then check the grounding and ensure all connections are watertight to prevent electrical hazards.
Once completed, perform a power test. Activate the pump, check the hydromassage jets and ensure everything works correctly. If in doubt, call a professional electrician.
Adjustments and finishing touches
The final adjustments ensure stability and watertightness. Start with a final level check, then secure the bathtub by tightening the adjustable feet.
Install the panel and apply a silicone seal around the bathtub to prevent leaks. Then perform a first test: fill, activate the hydromassage system, check drainage and ensure there are no leaks.
Proper adjustment extends the lifespan of your installation.
Two common mistakes to avoid
Poor alignment
Installing a whirlpool bathtub requires precision to avoid costly mistakes. Poor alignment can cause instability, affecting drainage and leading to leaks. Always check leveling before fixing the bathtub.
Incorrect electrical connection
On the electrical side, an incorrect connection can lead to electrocution risks. It is essential to use a 30 mA circuit breaker, ensure proper grounding and watertight connections.
Never connect the bathtub to a standard outlet! If unsure, call a professional.
Who can install your whirlpool bathtub?
Installing a whirlpool bathtub requires skills in plumbing and electricity. Several options are available.
A plumber handles water connections, drainage and sealing, while a certified electrician ensures a safe electrical setup.
Some professionals offer a turnkey service. If you choose to install it yourself, carefully follow instructions and use proper tools.
A specialized installer remains the safest option.
Installation cost of a whirlpool bathtub
The installation cost varies depending on complexity and labor.
On average, expect between €400 and €1500 for full installation. An electrician costs between €150 and €500.
Request multiple quotes before starting.
Tips for choosing your installer
Choose a qualified installer with insurance.
Check reviews and request a detailed quote.
Ensure compliance with NF C 15-100 standards.
Compare quotes for best value.